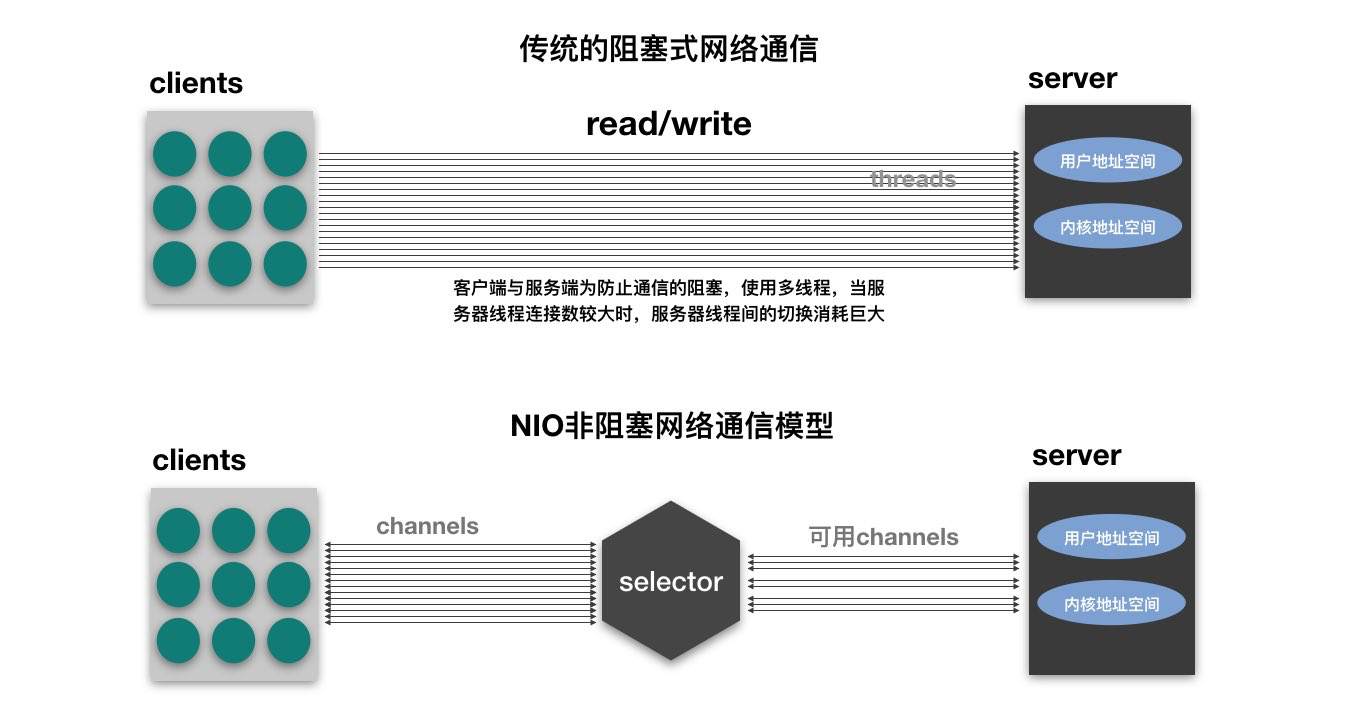
NIO 简介 NIO是什么? 本质上,Java NIO 底层的实现是IO多路复用模型,只不过 Java NIO 组件提供了统一的 API,为大家屏蔽了底层的操作系统的差异。
new IO 或 non blocking IO,java 1.4开始引入(JDK1.7+中的NIO统称为NIO.2)可以替代标准的java io api;
与旧IO有着相同的作用和目的,但使用方式完全不同,NIO面向缓冲区、基于通道,文件的读写更加灵活高效。
Java NIO类库包含以下三个核心组件:
Channel(通道)
Buffer(缓冲区)
Selector(选择器)
与传统IO有什么区别?
IO
NIO
面向流(I/O Stream Oriented)
面向缓冲区(Buffer Oriented)
阻塞IO(Blocking IO)
非阻塞式IO(Non Blocking IO)
无选择器的概念
有选择器,需要底层操作系统提供支持
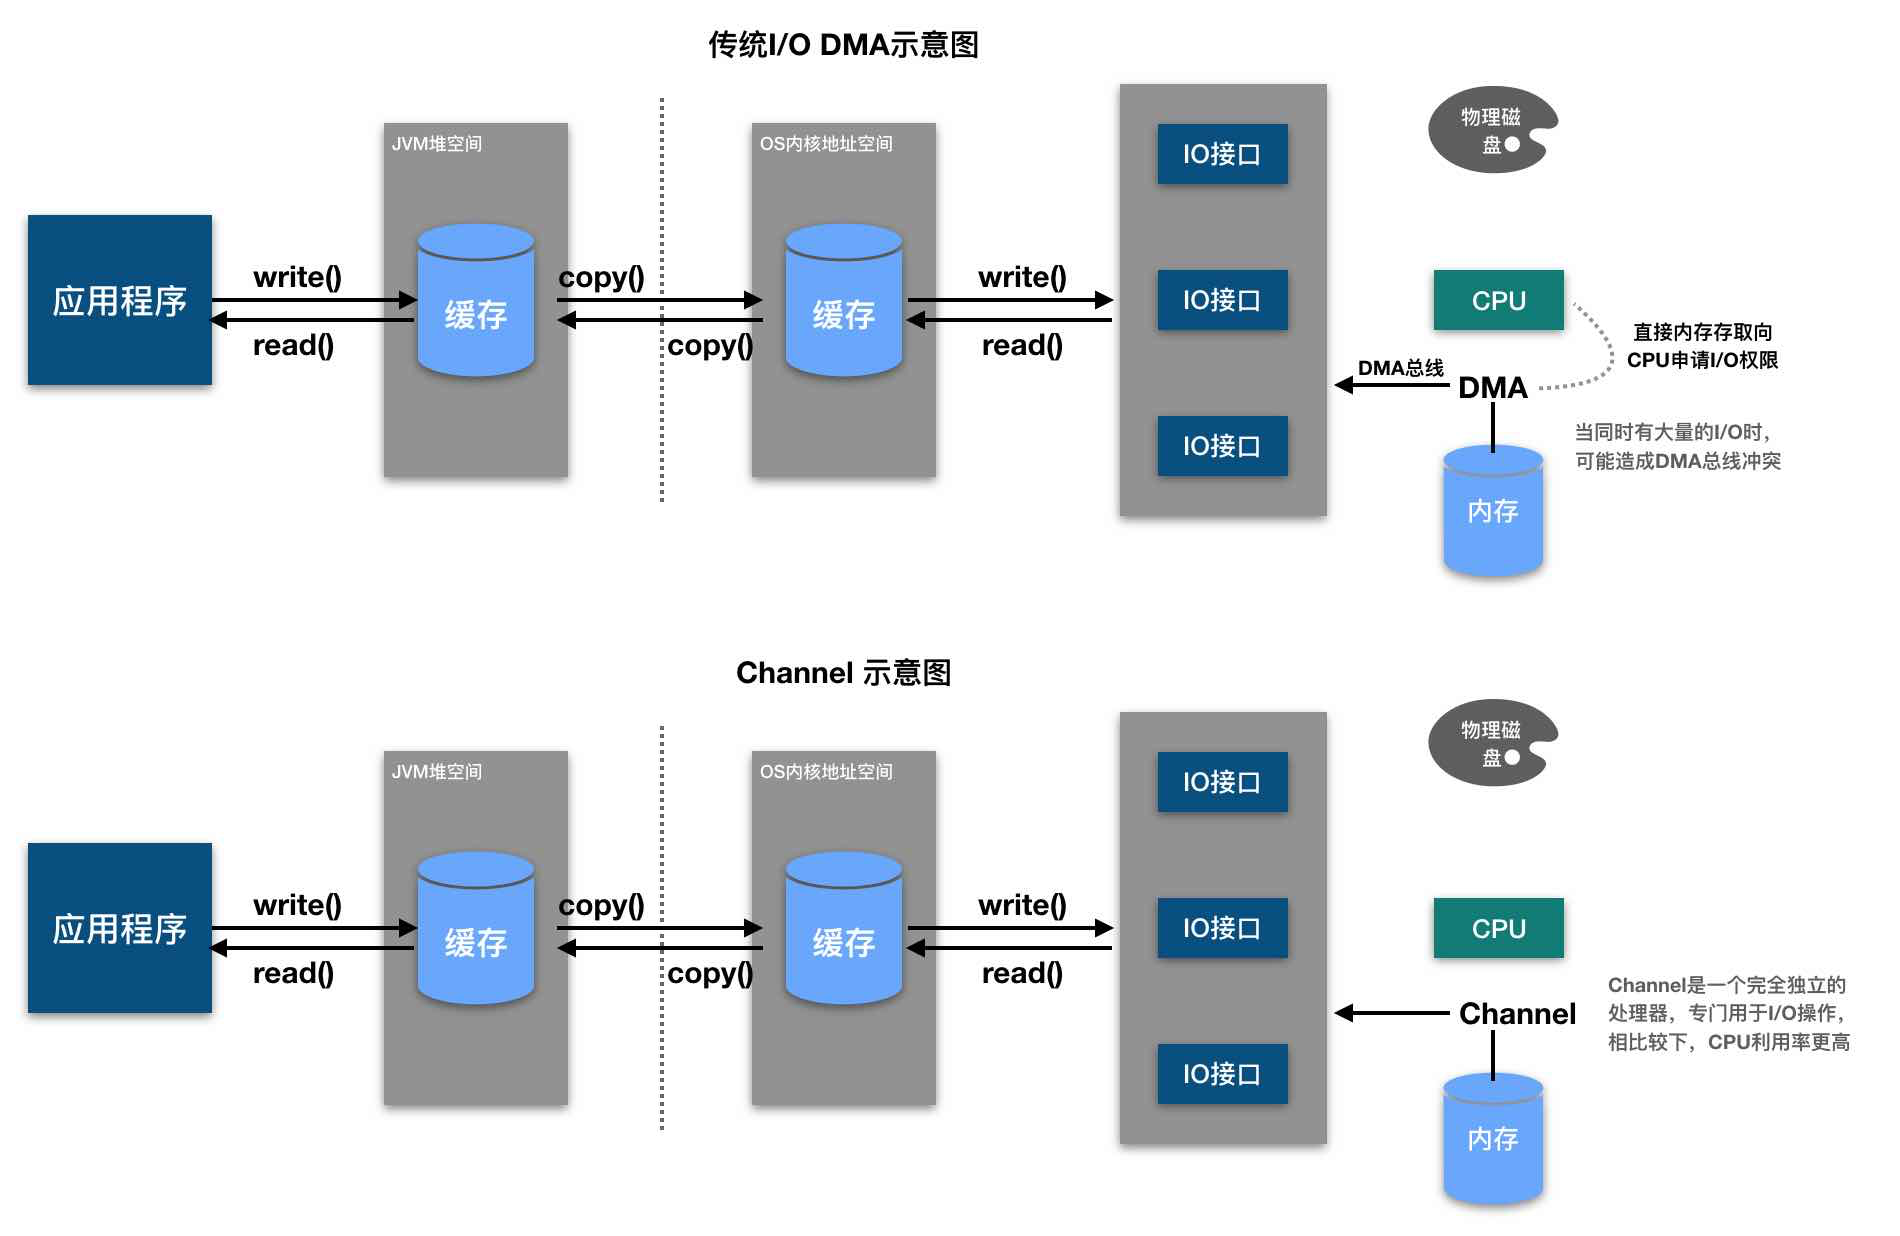
啥是通道、缓冲区? NIO的核心在于通道(channel)和缓冲区(buffer)。通道表示打开到IO设备(例如文件、套接字)的连接,若需要NIO系统,需要获取用于连接IO系统设备的通道以及用于容纳数据的缓冲区,然后操作缓冲区,对数据进行处理。简而言之,channel负责搭建传输通道,buffer负责数据的存取 。
具体来说,在OIO中,同一个网络连接会关联到两个流:一个是输入流 (Input Stream),另一个是输出流(Output Stream)。Java应用程序通过这两个流不断地进行输入和输出的操作。 在NIO中,一个网络连接使用一个通道表示,所有NIO的IO操作都是通过连接通道完成的。一个通道类似于OIO中两个流的结合体,既可以从通道读取数据,也可以向通道写入数据。
应用程序与通道的交互主要是进行数据的读取和写入。为了完成 NIO的非阻塞读写操作,NIO为我们准备了 Buffer。所谓通道的读取,就是将数据从通道读取到缓冲区中;所谓通道的写入,就是将数据从缓冲区写入通道中。缓冲区的使用是面向流进行读写操作的OIO所没有的,也是NIO非阻塞的重要前提和基础之 一。
啥是选择器? Java 的 Selector 是一个 API 名称,它在不同的操作系统可能具有不同的具体实现。这里我们以 netty 的实现为例,具体拆解说清楚这个 Selector 的含义。
Netty 通过统一的 Java Selector 接口抽象了底层 I/O 多路复用,Selector 是 Java 层面的抽象,在 Linux 平台下的默认实现是 EpollSelector,底层使用的是 epoll(而非过时的 select)。
三层架构:从抽象到实现:
1
2
3
4
5
6
7
8
9
10
Netty 应用层 │ ↓ Java NIO Selector (java.nio.channels.Selector) ←─ 这是“抽象” │ ↓ 平台特定实现 ├── Linux: sun.nio.ch.EPollSelectorImpl ←─ 底层是 epoll ├── macOS: sun.nio.ch.KQueueSelectorImpl ←─ 底层是 kqueue └── Windows: sun.nio.ch.WindowsSelectorImpl ←─ 底层是 IOCP (Windows 版)
Netty 的 Selector 选择策略:
1 2 3 4 5 6 7 8 9 10 if (isWindows()) { return new WindowsSelectorProvider (); } else if (isLinux()) { if (Epoll.isAvailable()) { return new EpollSelectorProvider (); } } return SelectorProvider.provider();
实际上,Netty 不满足于 JDK 的默认实现,还提供了性能更强的原生实现:
1 2 3 4 5 6 EventLoopGroup group; group = new NioEventLoopGroup (); group = new EpollEventLoopGroup ();
你可以通过以下命令查看 Netty 实际使用的 Selector:
1 2 3 4 5 -Djava.nio.channels.spi.SelectorProvider=sun.nio.ch.EPollSelectorProvider System.out.println(SelectorProvider.provider().getClass().getName());
具体的调用过程示意图:
缓冲区(buffer) buffer的分类 NIO的Buffer本质上是一个内存块,既可以写入数据,也可以从中读取数据。Java NIO中代表缓冲区的Buffer类是一个抽象类,位于 java.nio包中。Buffer内部是一个内存块(数组),注意作为读写缓冲区的数 组,并没有定义在Buffer类中,而是定义在各具体子类中。
与普通的内存块(Java 数组)不同的是:NIO Buffer对象提供了一组比较有效的方法,用来进行写入和读取的交替访问。在NIO中, 有8种缓冲区类:
ByteBuffer
ShortBuffer
IntBuffer
LongBuffer
DubbleBuffer
FloatBuffer
CharBuffer
MappedByteBuffer
前7种Buffer类型覆盖了能在IO中传输的所有Java 基本数据类型,第8种类型是一种专门用于内存映射的ByteBuffer类 型。不同的Buffer子类可以操作的数据类型能够通过名称进行判断, 比如 IntBuffer 只能操作 Integer 类型的对象。最常用的是ByteBuffer。上述缓冲区的管理方式几乎一致,都是通过allocate()获取缓冲区。
buffer的基本方法 缓冲区存取数据的两个核心方法:
put 存入数据到buffer中get 获取buffer中的数据
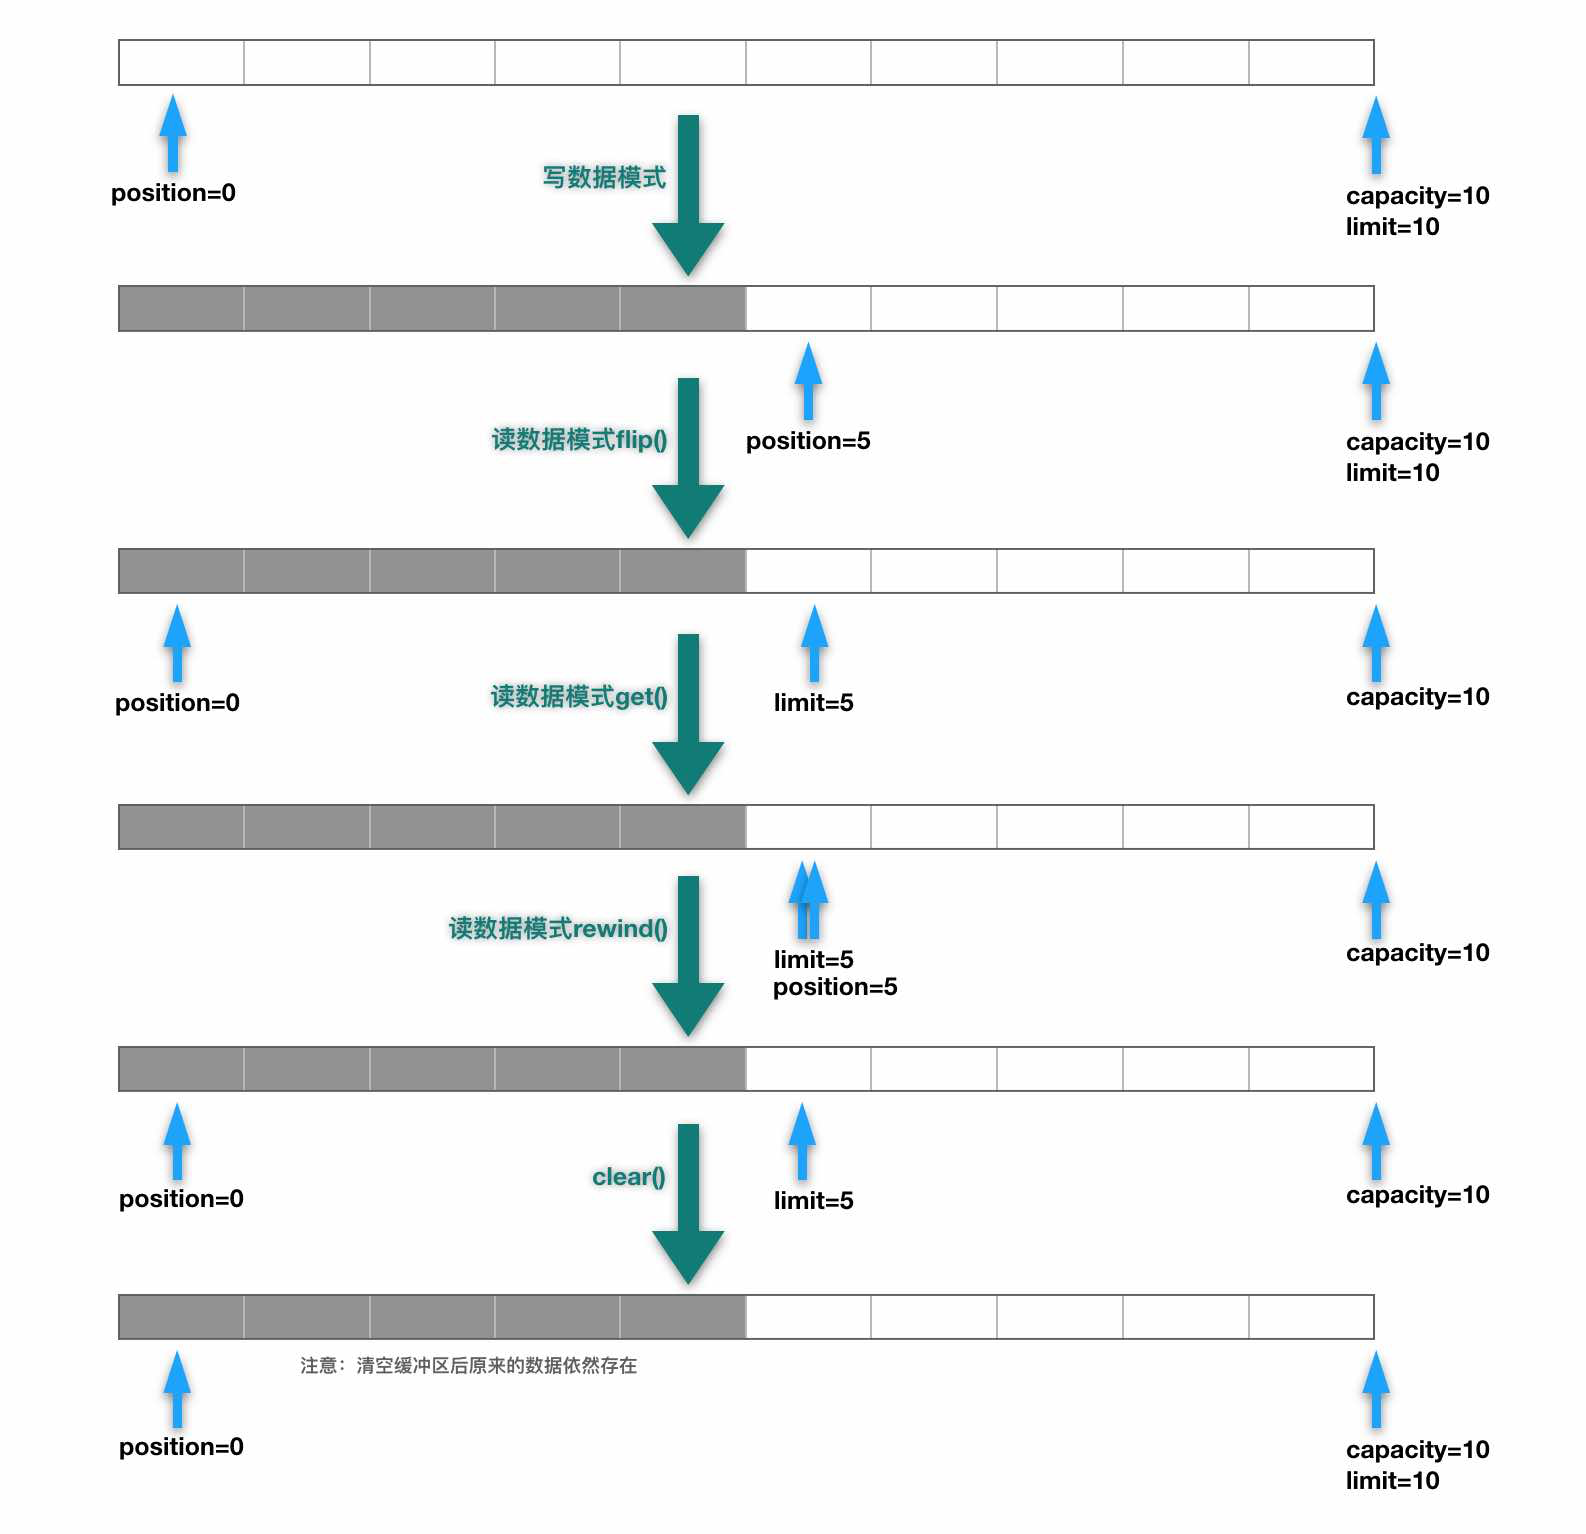
要想对缓冲区的数据进行正确的存取,必须先要熟悉buffer缓冲区的几个核心属性,如下:
capacity 表示缓冲区中最大存储数据的容量,一旦声明不能改变。注意这里的capacity并不是指内部的内存块byte[]数组的字节数量,而是指能写入的数据对象的最大限制数量,下面的参数都是同理。limit 表示缓冲区中可以操作数据的容量大小(limit后面的数据不能进行读写,默认初始大小与capacity相等);position 表示缓冲区中正在操作数据的位置mark 表示通过mark方法标记的当前position的位置,可以通过reset方法重置buffer的position到mark的位置。
综上可以看出 0 <= mark <= position <= limit <= capacity。请看如下简单的测试方法:
1 2 3 4 5 6 7 8 9 10 11 12 13 14 15 16 17 18 19 20 21 22 23 24 25 26 27 28 29 30 31 32 33 34 35 36 37 38 39 40 41 42 43 44 45 46 47 48 @Test public void test01 () { ByteBuffer buffer = ByteBuffer.allocate(10 ); System.out.println(buffer.position()); System.out.println(buffer.limit()); System.out.println(buffer.capacity()); String str = "abcde" ; buffer.put(str.getBytes()); System.out.println(buffer.position()); System.out.println(buffer.limit()); System.out.println(buffer.capacity()); buffer.flip(); System.out.println(buffer.position()); System.out.println(buffer.limit()); System.out.println(buffer.capacity()); byte [] bs = new byte [buffer.limit()]; ByteBuffer buffer2 = buffer.get(bs); System.out.println(new String (bs)); System.out.println(buffer2==buffer); System.out.println(buffer.position()); System.out.println(buffer.limit()); System.out.println(buffer.capacity()); buffer.rewind(); System.out.println(buffer.position()); System.out.println(buffer.limit()); System.out.println(buffer.capacity()); buffer.clear(); System.out.println(buffer.position()); System.out.println(buffer.limit()); System.out.println(buffer.capacity()); }
mark 和 reset 两个方法是配套使用的:Buffer.mark() 方法将当前 position 的值保存起来放在 mark 属性中,让 mark 属性记住这个临时位置;然后可以调用Buffer.reset()方法将mark的值恢复到 position中。
1 2 3 4 5 6 7 8 9 10 11 12 13 14 15 16 17 18 19 20 21 22 23 24 25 26 27 28 29 30 31 32 33 34 35 36 37 38 39 40 @Test public void test2 () { ByteBuffer buffer = ByteBuffer.allocate(10 ); System.out.println(buffer.position()); System.out.println(buffer.limit()); System.out.println(buffer.capacity()); String str = "abcde" ; buffer.put(str.getBytes()); System.out.println(buffer.position()); System.out.println(buffer.limit()); System.out.println(buffer.capacity()); buffer.flip(); byte [] bs = new byte [buffer.limit()]; buffer.get(bs, 0 , 2 ); System.out.println(new String (bs, 0 , 2 )); System.out.println(buffer.position()); buffer.mark(); buffer.get(bs, 2 , 2 ); System.out.println(new String (bs, 2 , 2 )); System.out.println(buffer.position()); buffer.reset(); System.out.println(buffer.position()); if (buffer.hasRemaining()) { System.out.println(buffer.remaining()); } }
使用Buffer类的基本步骤:
使用创建子类实例对象的allocate()方法创建一个Buffer类 的实例对象。
调用put()方法将数据写入缓冲区中。
写入完成后,在开始读取数据前调用Buffer.flip()方法, 将缓冲区转换为读模式。
调用get()方法,可以从缓冲区中读取数据。
读取完成后,调用Buffer.clear()方法或Buffer.compact() 方法,将缓冲区转换为写模式,可以继续写入。
几个基本方法的源码 1 2 3 4 5 6 7 8 9 10 11 12 13 14 15 16 17 18 19 20 21 22 23 24 25 26 27 28 29 30 31 32 33 34 35 36 37 38 39 40 41 42 43 44 45 46 47 48 49 50 51 52 53 54 55 56 57 58 59 60 61 62 63 64 65 66 67 68 69 70 public Buffer flip () { limit = position; position = 0 ; mark = -1 ; return this ; } public Buffer rewind () { position = 0 ; mark = -1 ; return this ; } public final boolean hasRemaining () { return position < limit; } public final int remaining () { int rem = limit - position; return rem > 0 ? rem : 0 ; } public Buffer mark () { mark = position; return this ; } public Buffer reset () { int m = mark; if (m < 0 ) throw new InvalidMarkException (); position = m; return this ; } public Buffer clear () { position = 0 ; limit = capacity; mark = -1 ; return this ; }
buffer的非线程安全 Buffer及其子类(ByteBuffer、CharBuffer等)都是非线程安全的类。这么设计完全是出于性能考虑。NIO的设计哲学:
单线程处理单连接 :在 Reactor 模式下,一个 Channel 只会被一个 EventLoop 线程处理零拷贝优化 :DirectByteBuffer 直接操作堆外内存,减少 JVM 开销极致性能 :为了减少 1 微秒的延迟,放弃所有线程安全开销
基于这一点,生产环境 Netty 的标准正确用法应该是:
1 2 3 4 5 6 7 8 9 10 11 12 13 14 public class MyHandler extends ChannelInboundHandlerAdapter { @Override public void channelRead (ChannelHandlerContext ctx, Object msg) { ByteBuf buf = (ByteBuf) msg; try { processBuffer(buf); } finally { buf.release(); } } }
线程间传递的解决方案:
1 2 3 4 5 6 7 8 9 10 11 12 13 14 15 16 17 18 19 20 21 22 23 24 25 26 27 28 29 30 31 32 33 34 35 36 ByteBuffer original = ByteBuffer.allocate(1024 );ByteBuffer copy = ByteBuffer.allocate(original.capacity());copy.put(original); original.flip(); copy.flip(); ByteBuf buf = Unpooled.buffer(1024 );buf.writeBytes("Hello" .getBytes()); System.out.println("初始引用计数: " + buf.refCnt()); buf.retain(); otherThreadExecutor.execute(() -> { try { System.out.println("工作线程读取: " + buf.toString(StandardCharsets.UTF_8)); System.out.println("工作线程引用计数: " + buf.refCnt()); } finally { buf.release(); } }); buf.release(); private static final ThreadLocal<ByteBuffer> BUFFER_LOCAL = ThreadLocal.withInitial(() -> ByteBuffer.allocateDirect(1024 )); pool.submit(() -> { try { ByteBuffer buffer = BUFFER_LOCAL.get(); } finally { BUFFER_LOCAL.remove(); } });
现代框架的实际组合使用:
1 2 3 4 5 6 7 8 9 10 11 12 13 14 15 16 17 18 19 20 21 22 23 24 25 public class AdvancedHandler extends ChannelInboundHandlerAdapter { private static final ThreadLocal<byte []> TEMP_BUFFER = ThreadLocal.withInitial(() -> new byte [256 ]); @Override public void channelRead (ChannelHandlerContext ctx, Object msg) { ByteBuf data = (ByteBuf) msg; data.retain(); businessPool.submit(() -> { try { processBigData(data); } finally { data.release(); } }); byte [] temp = TEMP_BUFFER.get(); data.getBytes(0 , temp, 0 , Math.min(256 , data.readableBytes())); processMetadata(temp); } }
直接和非直接缓冲区 这两类缓冲的定义如下:
非直接缓冲区 :通过 allocate() 方法分配的缓冲区,将缓冲区建立在 JVM的内存中,传统I/O操作使用的缓冲区以及通过 allocate() 创建的缓冲区都属于非直接缓冲区;直接缓冲区 :通过 allocateDirect() 方法分配的缓冲区,将缓冲区建立在 操作系统的物理内存中,直接缓冲区方式通过在物理内存中创建映射文件减少了中间的 copy 步骤,因而I/O效率较高,但也增加了应用程序的不稳定性;直接字节缓冲区 (注意只是字节缓冲区)还可以通过 FileChannel.map() 方法将文件区域直接映射到内存中来创建,该方法返回 MappedByteBuffer。Java平台的实现有助于通过JNI从本机代码创建直接字节缓冲区。如果以上这些缓冲区中的某个缓冲区实例指的是不可访问的区域,则试图访问该区域不会更改缓冲区的内容,并且将会在访问期间或稍后的某个时间导致抛出不确定的异常。字节缓冲区是直接还是非直接缓冲区,可以通过调用 isDirect() 方法来确定,以便在性能关键性代码中执行显示的缓冲区管理;
注意,创建直接缓冲区的消耗要大于非直接缓冲区,直接缓冲区的内容可以驻留在常规的垃圾回收堆外,它不受JVM控制,而是受控于操作系统,因此直接缓冲区对应用程序内存造成的影响不明显。建议将直接缓冲区分配给那些易受基础系统的本机I/O操作影响的大型、持久的对象。一般最好仅在直接缓冲区能在程序性能方面带来明显好处时分配它们。
简单测试及源码:
1 2 3 4 5 6 7 8 9 10 11 12 13 14 15 16 17 18 19 20 21 22 23 24 25 26 27 28 29 30 31 32 33 34 35 36 37 38 39 40 41 42 43 @Test public void test03 () { ByteBuffer buffer1 = ByteBuffer.allocate(10 ); System.out.println(buffer1.isDirect()); ByteBuffer buffer2 = ByteBuffer.allocateDirect(10 ); System.out.println(buffer2.isDirect()); } public static ByteBuffer allocate (int capacity) { if (capacity < 0 ) throw new IllegalArgumentException (); return new HeapByteBuffer (capacity, capacity); } public static ByteBuffer allocateDirect (int capacity) { return new DirectByteBuffer (capacity); } DirectByteBuffer(int cap) { super (-1 , 0 , cap, cap); boolean pa = VM.isDirectMemoryPageAligned(); int ps = Bits.pageSize(); long size = Math.max(1L , (long )cap + (pa ? ps : 0 )); Bits.reserveMemory(size, cap); long base = 0 ; try { base = unsafe.allocateMemory(size); } catch (OutOfMemoryError x) { Bits.unreserveMemory(size, cap); throw x; } unsafe.setMemory(base, size, (byte ) 0 ); if (pa && (base % ps != 0 )) { address = base + ps - (base & (ps - 1 )); } else { address = base; } cleaner = Cleaner.create(this , new Deallocator (base, size, cap)); att = null ; }
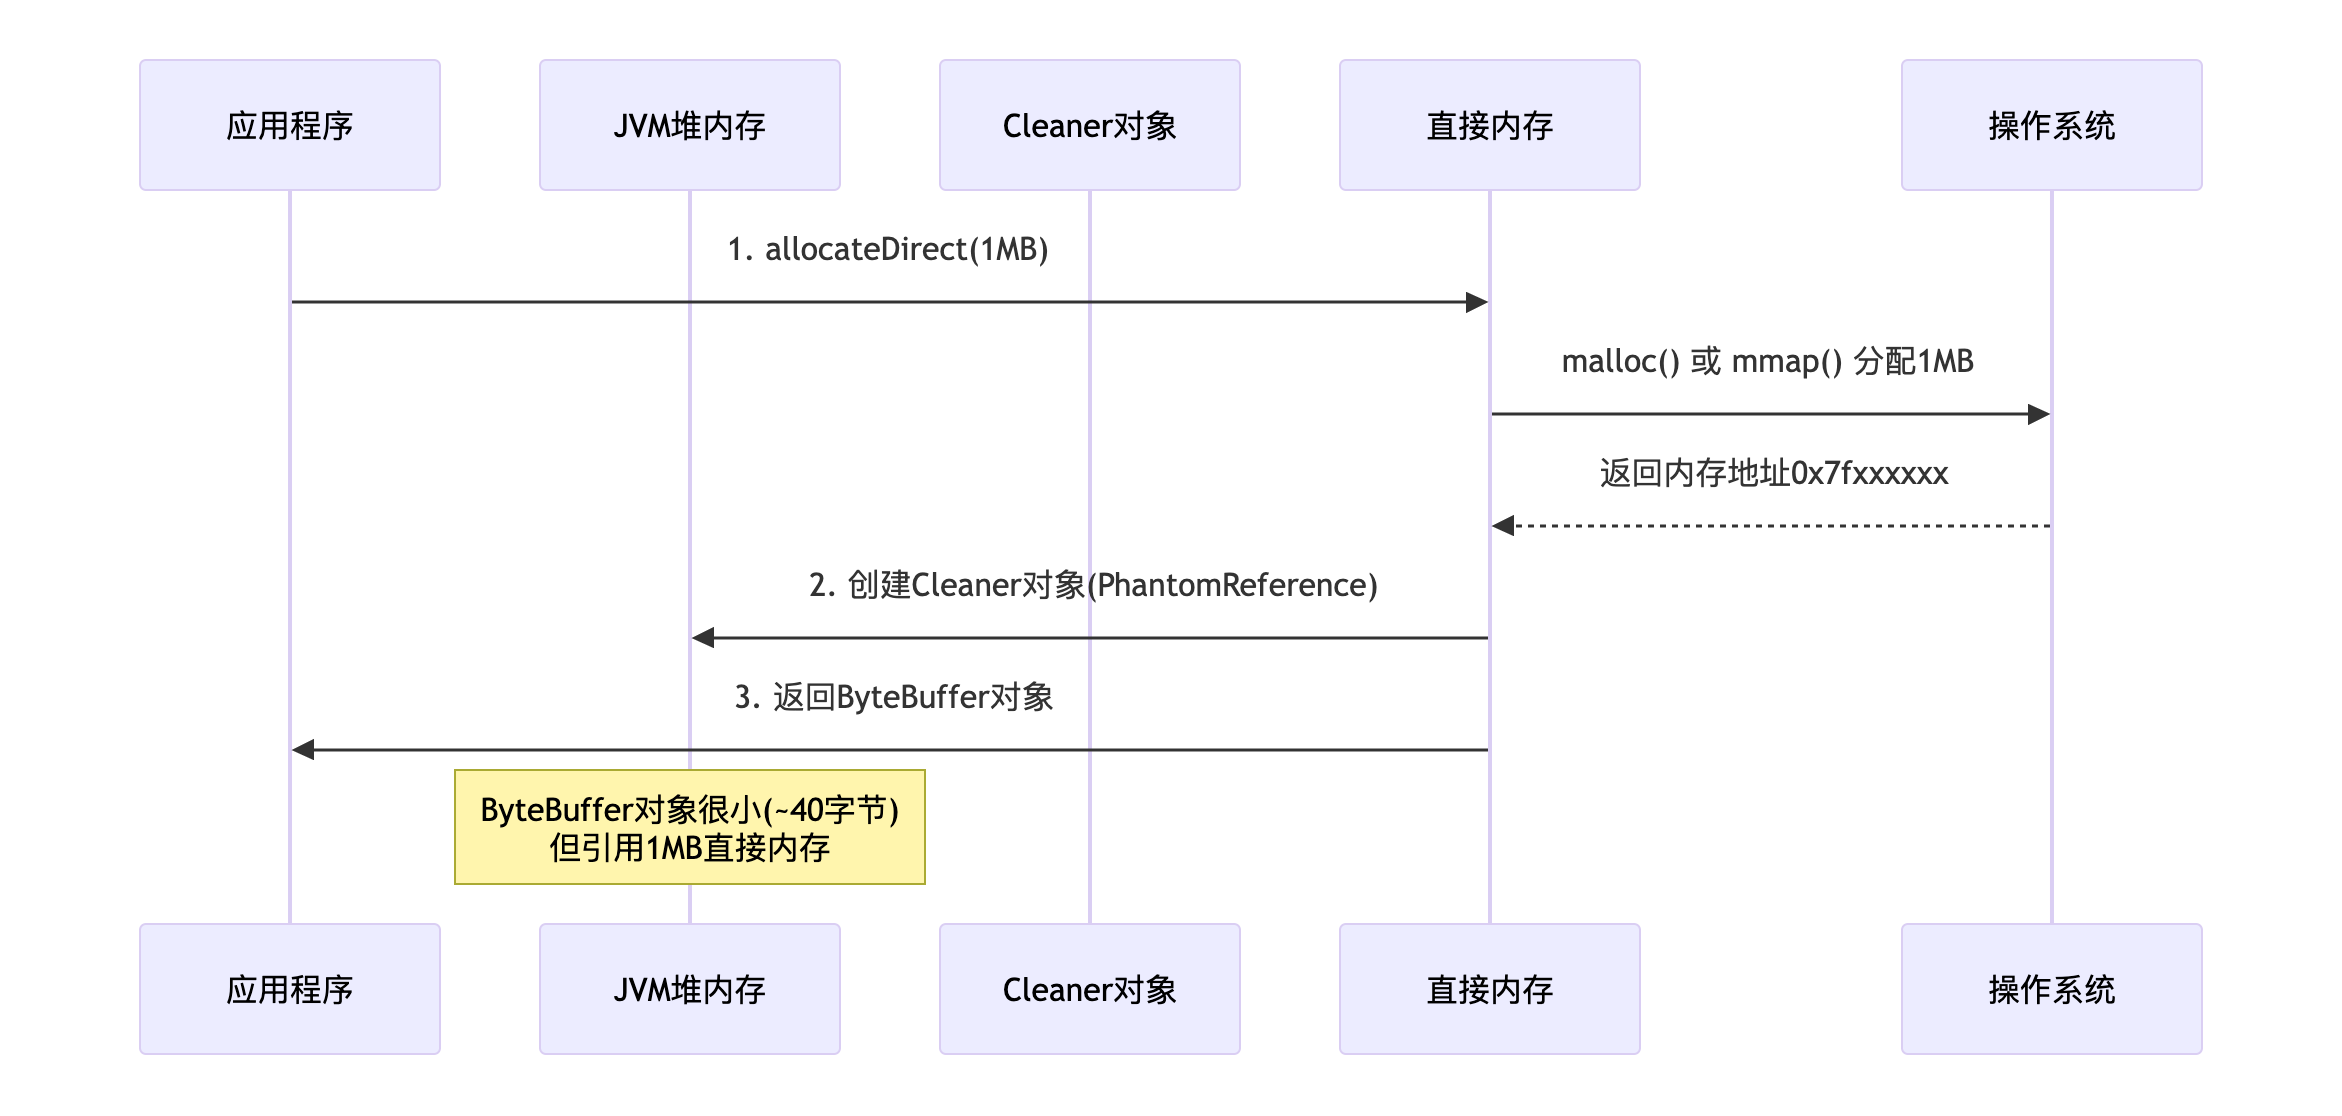
直接内存的分配和释放 内存的分配原理 1 2 ByteBuffer buffer = ByteBuffer.allocateDirect(1024 * 1024 );
实际发生了以下几步:
关键点:
两段内存 :一个小ByteBuffer对象(在堆内) + 一大块直接内存(在堆外)引用关系 :ByteBuffer通过 address 字段保存直接内存地址清理钩子 :创建 Cleaner(PhantomReference子类)用于释放内存
性能对照实验 1 2 3 4 5 6 7 8 9 10 11 12 13 14 15 16 17 18 19 20 21 22 23 24 25 26 27 28 29 30 31 32 33 34 35 36 37 38 39 40 41 42 43 44 45 46 47 48 49 50 51 52 53 public static void performanceComparison () { System.out.println("=== 示例:性能对比 ===" ); int size = 10 * 1024 * 1024 ; int iterations = 100 ; long directStart = System.currentTimeMillis(); ByteBuffer directBuffer = ByteBuffer.allocateDirect(size); for (int i = 0 ; i < iterations; i++) { for (int j = 0 ; j < size; j++) { directBuffer.put((byte ) (j & 0xFF )); } directBuffer.flip(); while (directBuffer.hasRemaining()) { directBuffer.get(); } directBuffer.clear(); } long directTime = System.currentTimeMillis() - directStart; long heapStart = System.currentTimeMillis(); ByteBuffer heapBuffer = ByteBuffer.allocate(size); for (int i = 0 ; i < iterations; i++) { for (int j = 0 ; j < size; j++) { heapBuffer.put((byte ) (j & 0xFF )); } heapBuffer.flip(); while (heapBuffer.hasRemaining()) { heapBuffer.get(); } heapBuffer.clear(); } long heapTime = System.currentTimeMillis() - heapStart; System.out.printf("直接内存耗时: %,d ms%n" , directTime); System.out.printf("堆内存耗时: %,d ms%n" , heapTime); System.out.printf("性能差异: %.2fx%n" , (double ) heapTime / directTime); }
1 2 3 4 === 示例2:性能对比 === 直接内存耗时: 1,092 ms 堆内存耗时: 8,748 ms 性能差异: 8.01x
内存的释放或管理 方式1:自动GC释放(主要方式,但不可靠)
1 2 3 4 5 6 7 8 9 10 ByteBuffer buffer = ByteBuffer.allocateDirect(100 );buffer = null ; System.gc();
方式2:显式调用Cleaner
1 2 3 4 5 6 7 8 9 10 11 12 13 14 15 16 17 18 19 20 21 22 23 24 25 26 27 ByteBuffer buffer = ByteBuffer.allocateDirect(1024 * 1024 );if (buffer.isDirect()) { try { Method cleanerMethod = buffer.getClass().getMethod("cleaner" ); cleanerMethod.setAccessible(true ); Object cleaner = cleanerMethod.invoke(buffer); if (cleaner != null ) { Method cleanMethod = cleaner.getClass().getMethod("clean" ); cleanMethod.invoke(cleaner); } } catch (Exception e) { } } sun.misc.Unsafe unsafe = getUnsafe(); long address = ((sun.nio.ch.DirectBuffer) buffer).address();unsafe.freeMemory(address); if (buffer instanceof sun.nio.ch.DirectBuffer) { ((sun.nio.ch.DirectBuffer) buffer).cleaner().clean(); }
更加推荐的使用方式:内存池(如 Netty)
1 2 3 4 5 6 7 8 9 10 11 12 13 14 15 16 17 18 19 20 21 22 23 24 25 26 27 28 29 30 31 32 33 34 35 36 37 public ByteBuffer processRequest (byte [] data) { ByteBuffer buffer = ByteBuffer.allocateDirect(data.length); buffer.put(data); return buffer; } public class DirectMemoryPool { private final Queue<ByteBuffer> pool = new ConcurrentLinkedQueue <>(); private final int bufferSize; public ByteBuffer borrowBuffer () { ByteBuffer buffer = pool.poll(); if (buffer == null ) { buffer = ByteBuffer.allocateDirect(bufferSize); } buffer.clear(); return buffer; } public void returnBuffer (ByteBuffer buffer) { if (buffer != null && buffer.isDirect()) { buffer.clear(); pool.offer(buffer); } } public void destroy () { for (ByteBuffer buffer : pool) { if (buffer instanceof sun.nio.ch.DirectBuffer) { ((sun.nio.ch.DirectBuffer) buffer).cleaner().clean(); } } pool.clear(); } }
防御性编程模板
1 2 3 4 5 6 7 8 9 10 11 12 13 14 15 16 17 18 19 20 21 22 23 24 25 26 27 28 29 30 31 32 33 34 35 36 37 38 39 40 41 42 43 44 45 46 47 48 public class SafeDirectBuffer implements AutoCloseable { private ByteBuffer buffer; private boolean closed = false ; public SafeDirectBuffer (int capacity) { this .buffer = ByteBuffer.allocateDirect(capacity); } public ByteBuffer getBuffer () { if (closed) { throw new IllegalStateException ("Buffer已关闭" ); } return buffer; } @Override public void close () { if (!closed && buffer != null ) { try { if (buffer instanceof sun.nio.ch.DirectBuffer) { Cleaner cleaner = ((sun.nio.ch.DirectBuffer) buffer).cleaner(); if (cleaner != null ) { cleaner.clean(); } } } finally { buffer = null ; closed = true ; } } } @Override protected void finalize () throws Throwable { try { close(); } finally { super .finalize(); } } } try (SafeDirectBuffer safeBuffer = new SafeDirectBuffer (1024 )) { ByteBuffer buffer = safeBuffer.getBuffer(); }
通道(channel) 啥是通道? 前面提到,Java NIO中一个 socket 连接使用一个Channel来表示。 从更广泛的层面来说,一个通道可以表示一个底层的文件描述符,例 如硬件设备、文件、网络连接等。然而,远不止如此,Java NIO的通道可以更加细化。例如,不同的网络传输协议类型,在 Java 中都有不同的NIO Channel实现。
有哪些重要的通道? 这里不对Java NIO的全部通道类型进行过多的描述,仅着重介绍其中最为重要的四种Channel实现:FileChannel、SocketChannel、 ServerSocketChannel、DatagramChannel。
FileChannel :本地文件传输通道,用于本地文件的数据读写。SocketChannel :套接字通道,用于套接字TCP连接的数据读 写。ServerSocketChannel :服务端器监听通道,允许我们监听TCP连接请求,为每个监听到的请求创建一个 SocketChannel通道。DatagramChannel :UDP协议传输通道,用于UDP的数据读写。
FileChannel 介绍 通道的获取 获取通道的三种方式:
Java针对支持通道的类提供了 getChannel() 方法来获取通道,这些类有 FileInputStream、FileOutputStream、RandomAccessFile、Socket、ServerSocket、DatagramSocket等;
NIO.2(JDK1.7+)可以通过各个通道的实现类提供的静态方法 open() 来获取通道;
NIO.2(JDK1.7+)也可以通过 Files.newByteChannel 方法来获取通道;
使用 channel通道+非直接缓冲区 完成文件的复制:
1 2 3 4 5 6 7 8 9 10 11 12 13 14 15 16 17 18 19 20 21 22 23 24 25 26 27 28 29 30 31 32 33 34 35 36 37 38 39 40 41 @Test public void test01 () { FileInputStream fis = null ; FileOutputStream fos = null ; FileChannel fisChannel = null ; FileChannel fosChannel = null ; try { fis = new FileInputStream ("1.jpg" ); fos = new FileOutputStream ("2.jpg" ); fisChannel = fis.getChannel(); fosChannel = fos.getChannel(); ByteBuffer buffer = ByteBuffer.allocate(1024 ); while (fisChannel.read(buffer) != -1 ) { buffer.flip(); fosChannel.write(buffer); buffer.clear(); } } catch (IOException e) { e.printStackTrace(); } finally { if (fosChannel != null ) { try { fosChannel.close(); } catch (IOException e) { e.printStackTrace(); } } if (fisChannel != null ) { try { fisChannel.close(); } catch (IOException e) { e.printStackTrace(); } } if (fos != null ) { try { fos.close(); } catch (IOException e) { e.printStackTrace(); } } if (fis != null ) { try { fis.close(); } catch (IOException e) { e.printStackTrace(); } } } }
数据的读取和写入 在大部分应用场景中,从通道读取数据都会调用通道的int read(ByteBuffer buf)方法,它把从通道读取的数据写入ByteBuffer 缓冲区,并且返回读取的数据量。
1 2 3 4 5 6 7 8 9 10 11 12 RandomAccessFile file = new RandomAccessFile (fileName, "rw" );FileChannel channel = file.getChannel();ByteBuffer buf = ByteBuffer.allocate(CAPACITY);int length = -1 ;while ((length = channel.read(buf)) != -1 ) { }
把数据写入通道,在大部分应用场景中都会调用通道的 write(ByteBuffer)方法,此方法的参数是一个ByteBuffer缓冲区实 例,是待写数据的来源。write(ByteBuffer)方法的作用是从ByteBuffer缓冲区中读取数 据,然后写入通道自身,而返回值是写入成功的字节数。
1 2 3 4 5 6 7 8 9 buf.flip(); int outlength = 0 ;while ((outlength = outchannel.write(buf)) != 0 ) { System.out.println("写入的字节数:" + outlength); }
强制刷新到磁盘 在将缓冲区写入通道时,出于性能的原因,操作系统不可能每次 都实时地将写入数据落地(或刷新)到磁盘,完成最终的数据保存。在将缓冲区数据写入通道时,要保证数据能写入磁盘,可以在写 入后调用一下FileChannel的force()方法。
通道的关闭 当通道使用完成后,必须将其关闭。关闭非常简单,调用close() 方法即可。
文件的复制案例 1 2 3 4 5 6 7 8 9 10 11 12 13 14 15 16 17 18 19 20 21 22 23 24 25 26 27 28 29 30 31 32 33 34 35 36 37 38 39 40 41 42 43 44 45 46 47 48 49 50 51 52 53 54 55 56 57 58 59 60 61 62 63 64 65 66 67 68 69 70 public static void testCopy01 () throws IOException { Instant startTime = Instant.now(); Path source = Paths.get("/Users/xxx/Downloads/111.png" ); Path target = Paths.get("/Users/xxx/Downloads/222.png" ); try (FileChannel finChannel = FileChannel.open(source, StandardOpenOption.READ); FileChannel foutChannel = FileChannel.open(target, StandardOpenOption.READ, StandardOpenOption.WRITE, StandardOpenOption.CREATE, StandardOpenOption.TRUNCATE_EXISTING)) { long fileSize = finChannel.size(); long transferred = finChannel.transferTo(0 , fileSize, foutChannel); System.out.printf("零拷贝传输: %,d bytes%n" , transferred); } Instant endTime = Instant.now(); long durationMs = Duration.between(startTime, endTime).toMillis(); System.out.printf("耗时: %,d ms%n" , durationMs); } public static void testCopy02 () { File srcFile = new File ("/Users/xxx/Downloads/111.png" ); File destFile = new File ("/Users/xxx/Downloads/222.png" ); try { if (!destFile.exists()) { destFile.createNewFile(); } long startTime = System.currentTimeMillis(); FileInputStream fis = null ; FileOutputStream fos = null ; FileChannel inChannel = null ; FileChannel outchannel = null ; try { fis = new FileInputStream (srcFile); fos = new FileOutputStream (destFile); inChannel = fis.getChannel(); outchannel = fos.getChannel(); int length = -1 ; ByteBuffer buf = ByteBuffer.allocate(1024 ); while ((length = inChannel.read(buf)) != -1 ) { buf.flip(); int outlength = 0 ; while ((outlength = outchannel.write(buf)) != 0 ) { System.out.println("写入的字节数:" + outlength); } buf.clear(); } outchannel.force(true ); } finally { IOUtils.closeQuietly(outchannel); IOUtils.closeQuietly(fos); IOUtils.closeQuietly(inChannel); IOUtils.closeQuietly(fis); } long endTime = System.currentTimeMillis(); System.out.println("base复制毫秒数:" + (endTime - startTime)); } catch (IOException e) { e.printStackTrace(); } }
通道之间的数据传输可以直接更方便地使用:
1 2 long size1 = fosChannel.transferFrom(fisChannel, 0 , fisChannel.size()); long size2 = fisChannel.transferTo(0 , fisChannel.size(), fosChannel);
在实际工程中,transferTo 或 transferFrom 可能需要放在循环中多次调用。虽然它们的名称听起来像是一个“原子操作”,但由于它们直接与操作系统的内核缓冲区(Socket Buffer)和文件系统缓冲区(Page Cache)打交道,它们受到的物理限制是完全一样的。
transferTo 的底层在 Linux 上对应的是 sendfile 系统调用。数据只在内核态内部流动(从文件系统缓存直接到网络协议栈),它之所快,本质上是减少了数据拷贝的次数和上下文切换的开销。在传输时之所以会中断或只完成一部分,主要有以下三个原因:
Socket 缓冲区满: TCP 传输是有流控的。如果接收方处理太慢,或者网络带宽达到上限,发送方的 Socket 发送缓冲区就会被填满。此时,内核会停止从文件拷贝数据,transferTo 只能返回当前实际已经发送的字节数。操作系统限制: 许多操作系统(尤其是 Linux)对 sendfile 单次传输的数据量有上限(通常是 2GB)。如果文件大于 2GB,单次调用必然无法完成。内存压力: 内核在做数据交换时,也需要考虑页缓存(Page Cache)的调度,可能会因为资源波动而提前返回。
工业级的 “零拷贝” 循环写法:为了保证文件能完整传输,你必须记录当前的 Position(位置),并根据每次返回的 Transferred(已传输量)动态调整下一次的起点。
1 2 3 4 5 6 7 8 long pos = 0 ;long size = fileChannel.size();while (pos < size) { long sent = fileChannel.transferTo(pos, size - pos, socketChannel); if (sent <= 0 ) break ; pos += sent; }
transferFrom 的作用是从源通道读取数据并写入当前文件通道。它之所以不能一次性完成,原因如下:
源端数据还没到齐: 如果 srcChannel 是一个网络 Socket,内核缓冲区里此时可能只有 4KB 数据,即使你请求 count 为 10MB,它也只能把现有的 4KB 给你,然后立即返回 4096。目标端写入受阻: 如果磁盘 I/O 繁忙,或者触发了操作系统的同步刷盘机制,内核可能会暂停当前的写入操作,导致只写入了一部分数据。协议栈限制: 就像 transferTo 受限于发送缓冲区一样,transferFrom 受限于接收缓冲区。
1 2 3 4 5 6 7 8 long pos = 0 ;long count = expectedSize; while (pos < count) { long received = fileChannel.transferFrom(socketChannel, pos, count - pos); if (received <= 0 ) break ; pos += received; }
你可能会问:“既然都要写循环,Java 为什么不直接在底层帮我循环完再返回?” 这是为了非阻塞的灵活性:
控制权: 如果 transferTo 在底层死等 1GB 传输完才返回,那你的线程就会被阻塞很久。在高性能服务器(如 Netty)中,我们希望线程能立刻返回,去处理其他 Socket 的事件,而不是卡在某一个文件的拷贝上。超时与取消: 交给用户写循环,你可以随时插入逻辑:比如传输了 10 秒还没完,就主动断开;或者在循环里更新进度条。
SocketChannel 介绍 在NIO中,涉及网络连接的通道有两个:一个是SocketChannel, 负责连接的数据传输;另一个是ServerSocketChannel,负责连接的监听。其中,NIO中的 SocketChannel 传输通道与 OIO 中的 Socket 类对应, NIO 中的 ServerSocketChannel 监听通道对应于 OIO 中的 ServerSocket 类。ServerSocketChannel 仅应用于服务端,而 SocketChannel 同时处于服务端和客户端。所以,对于一个连接,两端都有一个负责传输的 SocketChannel。无论是 ServerSocketChannel 还是 SocketChannel,都支持阻塞和非阻塞两种模式。
socketChannel.configureBlocking(false):设置为非阻塞模式。
socketChannel.configureBlocking(true):设置为阻塞模式。
在阻塞模式下,SocketChannel 的连接、读、写操作都是同步阻塞式的,在效率上与 Java OIO 面向流的阻塞式读写操作相同。因此,在 这里不介绍阻塞模式下通道的具体操作。在非阻塞模式下,通道的操作是异步、高效的,这也是相对于传统OIO的优势所在。
通道的获取 1 2 3 4 5 6 SocketChannel socketChannel = SocketChannel.open();socketChannel.configureBlocking(false ); socketChannel.connect(new InetSocketAddress ("127.0.0.1" ,80 ));
在非阻塞情况下,与服务器的连接可能还没有真正建立,socketChannel.connect() 方法就返回了,因此需要不断地自旋,检查当前是否连接到了主机:
1 2 3 while (!socketChannel.finishConnect() ){ }
在连接建立的事件到来时,服务端的ServerSocketChannel能成功地查询出这个新连接事件,并且通过调用服务端ServerSocketChannel 监听套接字的accept()方法来获取新连接的套接字通道:
1 2 3 4 5 6 ServerSocketChannel server = (ServerSocketChannel) key.channel();SocketChannel socketChannel = server.accept();socketChannel.configureBlocking(false );
数据的读取和写入 当SocketChannel传输通道可读时,可以从SocketChannel读取数据,具体方法与前面的文件通道读取方法是相同的。调用read()方 法,将数据读入缓冲区ByteBuffer。在读取时,因为是异步的,所以我们必须检查read()的返回值, 以便判断当前是否读取到了数据。read()方法的返回值是读取的字节 数,如果是-1,那么表示读取到对方的输出结束标志,即对方已经输 出结束,准备关闭连接。实际上,通过read()方法读数据本身是很简 单的,比较困难的是在非阻塞模式下如何知道通道何时是可读的。这 需要用到NIO的新组件——Selector通道选择器。
1 2 ByteBufferbuf = ByteBuffer.allocate(1024 ); int bytesRead = socketChannel.read(buf);
和前面把数据写入FileChannel 一样,大部分应用场景都会调用通道的 write(ByteBufferbuf) 方法:
1 2 3 buffer.flip(); socketChannel.write(buffer);
通道的关闭 在关闭 SocketChannel 传输通道前,如果传输通道用来写入数据, 则建议调用一次 shutdownOutput() 终止输出方法,向对方发送一个输出的结束标志(-1)。然后调用 socketChannel.close() 方法,关闭套接字连接。
1 2 3 4 5 6 socketChannel.shutdownOutput(); IOUtils.closeQuietly(socketChannel);
发送文件的案例 客户端:
1 2 3 4 5 6 7 8 9 10 11 12 13 14 15 16 17 18 19 20 21 22 23 24 25 26 27 28 29 30 31 32 33 34 35 36 37 38 39 40 41 42 43 44 45 46 47 48 49 50 51 52 53 54 55 56 57 58 59 60 61 62 63 64 65 66 67 68 import java.io.File;import java.io.FileInputStream;import java.io.IOException;import java.net.InetSocketAddress;import java.nio.ByteBuffer;import java.nio.channels.FileChannel;import java.nio.channels.SocketChannel;import java.nio.charset.StandardCharsets;public class NioTCPClient { public static void main (String[] args) { new NioTCPClient ().sendFile("/Users/xxx/Downloads/test.png" , "127.0.0.1" , 9000 ); } public void sendFile (String srcPath, String host, int port) { File file = new File (srcPath); if (!file.exists()) { System.err.println("文件不存在: " + srcPath); return ; } try (FileInputStream fis = new FileInputStream (file); FileChannel fileChannel = fis.getChannel(); SocketChannel socketChannel = SocketChannel.open()) { socketChannel.connect(new InetSocketAddress (host, port)); socketChannel.configureBlocking(true ); System.out.println("成功连接服务端: " + host + ":" + port); byte [] fileNameBytes = file.getName().getBytes(StandardCharsets.UTF_8); ByteBuffer header = ByteBuffer.allocate(4 + fileNameBytes.length + 8 ); header.putInt(fileNameBytes.length); header.put(fileNameBytes); header.putLong(file.length()); header.flip(); while (header.hasRemaining()) { socketChannel.write(header); } System.out.println("协议头发送完毕,开始传输内容..." ); long position = 0 ; long size = file.length(); while (position < size) { long transferred = fileChannel.transferTo(position, size - position, socketChannel); if (transferred <= 0 ) { break ; } position += transferred; System.out.printf("传输进度: %.2f%%\r" , (position * 100.0 / size)); } System.out.println("\n文件传输成功!" ); socketChannel.shutdownOutput(); } catch (IOException e) { e.printStackTrace(); } } }
服务端:
1 2 3 4 5 6 7 8 9 10 11 12 13 14 15 16 17 18 19 20 21 22 23 24 25 26 27 28 29 30 31 32 33 34 35 36 37 38 39 40 41 42 43 44 45 46 47 48 49 50 51 52 53 54 55 56 57 58 59 60 61 62 63 64 65 66 67 68 69 70 71 72 73 74 75 76 77 78 79 80 81 82 83 84 85 86 87 88 89 90 91 92 93 94 95 96 97 98 99 100 101 102 103 104 105 106 107 108 109 110 111 112 113 114 115 116 117 118 119 120 121 122 123 124 125 126 127 128 129 130 131 132 133 134 135 136 137 138 139 140 141 142 143 144 145 146 147 148 import java.io.File;import java.io.FileOutputStream;import java.io.IOException;import java.net.InetSocketAddress;import java.nio.ByteBuffer;import java.nio.channels.*;import java.nio.charset.StandardCharsets;import java.util.Iterator;public class NioTCPServer { public static void main (String[] args) throws IOException { new NioTCPServer ().startServer(9000 ); } private static final int STATE_READ_LEN = 0 ; private static final int STATE_READ_NAME = 1 ; private static final int STATE_READ_SIZE = 2 ; private static final int STATE_READ_CONTENT = 3 ; static class ClientSession { int state = STATE_READ_LEN; String fileName; long fileLength; long receiveLength = 0 ; FileChannel outChannel; int fileNameLen; ByteBuffer headBuffer = ByteBuffer.allocate(8 ); } public void startServer (int port) throws IOException { Selector selector = Selector.open(); ServerSocketChannel serverChannel = ServerSocketChannel.open(); serverChannel.configureBlocking(false ); serverChannel.bind(new InetSocketAddress (port)); serverChannel.register(selector, SelectionKey.OP_ACCEPT); System.out.println("服务端已启动,监听端口: " + port); while (true ) { if (selector.select() <= 0 ) continue ; Iterator<SelectionKey> it = selector.selectedKeys().iterator(); while (it.hasNext()) { SelectionKey key = it.next(); it.remove(); if (key.isAcceptable()) { handleAccept(key, selector); } else if (key.isReadable()) { handleRead(key); } } } } private void handleAccept (SelectionKey key, Selector selector) throws IOException { ServerSocketChannel server = (ServerSocketChannel) key.channel(); SocketChannel socketChannel = server.accept(); socketChannel.configureBlocking(false ); socketChannel.register(selector, SelectionKey.OP_READ, new ClientSession ()); System.out.println("客户端连接成功: " + socketChannel.getRemoteAddress()); } private void handleRead (SelectionKey key) { SocketChannel sc = (SocketChannel) key.channel(); ClientSession session = (ClientSession) key.attachment(); ByteBuffer buffer = ByteBuffer.allocate(8192 ); try { int num; while ((num = sc.read(buffer)) > 0 ) { buffer.flip(); processProtocol(sc, session, buffer); buffer.clear(); } if (num == -1 ) { closeSession(key, session); } } catch (IOException e) { e.printStackTrace(); closeSession(key, session); } } private void processProtocol (SocketChannel sc, ClientSession session, ByteBuffer buffer) throws IOException { while (buffer.hasRemaining()) { switch (session.state) { case STATE_READ_LEN: if (buffer.remaining() >= 4 ) { session.fileNameLen = buffer.getInt(); session.state = STATE_READ_NAME; } else return ; break ; case STATE_READ_NAME: if (buffer.remaining() >= session.fileNameLen) { byte [] nameBytes = new byte [session.fileNameLen]; buffer.get(nameBytes); session.fileName = new String (nameBytes, StandardCharsets.UTF_8); File file = new File ("received_" + session.fileName); session.outChannel = new FileOutputStream (file).getChannel(); session.state = STATE_READ_SIZE; } else return ; break ; case STATE_READ_SIZE: if (buffer.remaining() >= 8 ) { session.fileLength = buffer.getLong(); session.state = STATE_READ_CONTENT; System.out.println("开始接收文件: " + session.fileName + ", 大小: " + session.fileLength); } else return ; break ; case STATE_READ_CONTENT: int remainingInFile = (int ) (session.fileLength - session.receiveLength); int writeSize = Math.min(buffer.remaining(), remainingInFile); ByteBuffer slice = buffer.slice(); slice.limit(writeSize); session.outChannel.write(slice); buffer.position(buffer.position() + writeSize); session.receiveLength += writeSize; if (session.receiveLength >= session.fileLength) { System.out.println("文件接收完成: " + session.fileName); session.outChannel.close(); } break ; } } } private void closeSession (SelectionKey key, ClientSession session) { try { if (session.outChannel != null ) session.outChannel.close(); key.channel().close(); key.cancel(); } catch (IOException e) { e.printStackTrace(); } } }
DatagramChannel 介绍 在Java中使用UDP传输数据比TCP更加简单。和 socket 的 TCP 不同, UDP不是面向连接的协议。使用 UDP 时,只要知道服务器的IP和端口就 可以直接向对方发送数据。在 Java NIO 中,使用 DatagramChannel 来处理 UDP
通道的获取 获取数据报通道的方式很简单,调用 DatagramChannel 类的 open 静态方法即可。然后调用configureBlocking(false)方法,设置成非阻塞模式。
1 2 3 4 DatagramChannel channel = DatagramChannel.open();datagramChannel.configureBlocking(false );
如果需要接收数据,还需要调用bind()方法绑定一个数据报的监听端口,具体如下:
1 2 channel.socket().bind(new InetSocketAddress (18080 ));
数据的读取和写入 当 DatagramChannel 通道可读时,可以从DatagramChannel 读取数据。和前面的 SocketChannel 读取方式不同,这里不调用 read 方法, 而是调用 receive(ByteBufferbuf) 方法将数据从 DatagramChannel读入,再写入ByteBuffer 缓冲区中。通道读取 receive(ByteBufferbuf) 方法虽然读取了数据到buf缓冲 区,但是其返回值是SocketAddress类型,表示返回发送端的连接地址 (包括IP和端口)。通过receive方法读取数据非常简单,但是在非阻塞模式下如何知道DatagramChannel通道何时是可读的呢?和 SocketChannel一样,同样需要用到NIO的新组件——Selector通道选择器。
1 2 3 4 ByteBuffer buf = ByteBuffer.allocate(1024 );SocketAddress clientAddr = datagramChannel.receive(buf);
向DatagramChannel发送数据,和向SocketChannel通道发送数据 的方法是不同的。这里不是调用write()方法,而是调用send()方法。由于UDP是面向非连接的协议,因此在调用send()方法发送数据时 需要指定接收方的地址(IP和端口)。
1 2 3 4 5 6 buffer.flip(); dChannel.send(buffer, new InetSocketAddress ("127.0.0.1" ,18899 )); buffer.clear();
通道的关闭 这个比较简单,直接调用close()方法即可关闭数据报通道。
发送数据的案例 在客户端使用 DatagramChannel 发送数据比在客户端使用 SocketChanne l发送数据要简单得多。
1 2 3 4 5 6 7 8 9 10 11 12 13 14 15 16 17 18 19 20 21 22 23 24 25 26 27 28 29 30 31 32 import java.io.IOException;import java.net.InetSocketAddress;import java.nio.ByteBuffer;import java.nio.channels.DatagramChannel;import java.util.Scanner;public class UDPClient { public static void main (String[] args) throws IOException { new UDPClient ().send(); } public void send () throws IOException { DatagramChannel dChannel = DatagramChannel.open(); dChannel.configureBlocking(false ); ByteBuffer buffer = ByteBuffer.allocate(1024 ); Scanner scanner = new Scanner (System.in); System.out.println("UDP客户端启动成功!" ); System.out.println("请输入发送内容: " ); while (scanner.hasNext()) { String next = scanner.next(); buffer.put(next.getBytes()); buffer.flip(); dChannel.send(buffer, new InetSocketAddress ("127.0.0.1" ,9001 )); buffer.clear(); } dChannel.close(); } }
在服务端,首先调用了bind()方法绑定DatagramChannel的监听端 口。当数据到来时调用了receive()方法,从DatagramChannel接收数 据后写入ByteBuffer缓冲区中。在服务端代码中,为了监控数据的到来,使用了Selector。
1 2 3 4 5 6 7 8 9 10 11 12 13 14 15 16 17 18 19 20 21 22 23 24 25 26 27 28 29 30 31 32 33 34 35 36 37 38 39 40 41 42 43 44 45 46 47 48 49 50 51 52 import java.io.IOException;import java.net.InetSocketAddress;import java.net.SocketAddress;import java.nio.ByteBuffer;import java.nio.channels.DatagramChannel;import java.nio.channels.SelectionKey;import java.nio.channels.Selector;import java.util.Iterator;public class UDPServer { public static void main (String[] args) throws IOException { new UDPServer ().receive(); } public void receive () throws IOException { DatagramChannel datagramChannel = DatagramChannel.open(); datagramChannel.configureBlocking(false ); datagramChannel.bind(new InetSocketAddress ("127.0.0.1" ,9001 )); System.out.println("UDP服务器启动成功!" ); int i = datagramChannel.validOps(); Selector selector = Selector.open(); datagramChannel.register(selector, SelectionKey.OP_READ); while (selector.select() > 0 ) { Iterator<SelectionKey> iterator = selector.selectedKeys().iterator(); ByteBuffer buffer = ByteBuffer.allocate(1024 ); while (iterator.hasNext()) { SelectionKey selectionKey = iterator.next(); iterator.remove(); if (selectionKey.isReadable()) { SocketAddress client = datagramChannel.receive(buffer); buffer.flip(); System.out.println(new String (buffer.array(), 0 , buffer.limit())); buffer.clear(); } } } selector.close(); datagramChannel.close(); } }
附1.分散和聚集通道 概念介绍
分散读取(scattering reads):将通道中的数据按顺序分散到多个缓冲区中
聚集写入(gathering writes):将多缓冲区中的数据按顺序聚集到通道中
分散或聚集 IO 是使用多个而不是单个缓冲区来保存数据的读写方法。一个分散的读取就像一个常规通道读取,只不过它是将数据读到一个缓冲区数组中而不是读到单个缓冲区中。同样地,一个聚集写入是向缓冲区数组而不是向单个缓冲区写入数据。分散或聚集 IO 对于将数据流划分为单独的部分很有用,这有助于实现复杂的数据格式。
通道接口 通道可以有选择地实现两个新的接口: ScatteringByteChannel 和 GatheringByteChannel。
ScatteringByteChannel 是一个具有两个附加读方法的通道。这些read()方法很像标准的read方法,只不过它们不是取单个缓冲区而是取一个缓冲区数组。在分散读取中,通道依次填充每个缓冲区。填满一个缓冲区后,它就开始填充下一个。在某种意义上,缓冲区数组就像一个大缓冲区。
long read( ByteBuffer[] dsts );
long read( ByteBuffer[] dsts, int offset, int length );
GatheringByteChannel是一个具有两个附加写方法的通道。聚集写对于把一组单独的缓冲区中组成单个数据流很有用。为了与上面的消息例子保持一致,您可以使用聚集写入来自动将网络消息的各个部分组装为单个数据流,以便跨越网络传输消息。
long write( ByteBuffer[] srcs );
long write( ByteBuffer[] srcs, int offset, int length );
具体应用案例 分散/聚集 I/O 对于将数据划分为几个部分很有用。例如,您可能在编写一个使用消息对象的网络应用程序,每一个消息被划分为固定长度的头部和固定长度的正文。您可以创建一个刚好可以容纳头部的缓冲区和另一个刚好可以容纳正文的缓冲区。当您将它们放入一个数组中并使用分散读取来向它们读入消息时,头部和正文将整齐地划分到这两个缓冲区中。我们从缓冲区所得到的方便性对于缓冲区数组同样有效。因为每一个缓冲区都跟踪自己还可以接受多少数据,所以分散读取会自动找到有空间接受数据的第一个缓冲区。在这个缓冲区填满后,它就会移动到下一个缓冲区。
1 2 3 4 5 6 7 8 9 10 11 12 13 14 15 16 17 18 19 20 21 22 23 24 25 26 27 28 @Test public void test03 () throws IOException { RandomAccessFile raf1 = new RandomAccessFile ("http-header-body.txt" , "rw" ); RandomAccessFile raf2 = new RandomAccessFile ("http-header-body2.txt" , "rw" ); FileChannel inChannel = raf1.getChannel(); FileChannel outChannel = raf2.getChannel(); ByteBuffer buffer1 = ByteBuffer.allocate(40 ); ByteBuffer buffer2 = ByteBuffer.allocate(100 ); ByteBuffer[] buffers = {buffer1, buffer2}; inChannel.read(buffers); for (ByteBuffer buffer : buffers) { buffer.flip(); } System.out.println(new String (buffers[0 ].array(), 0 , buffers[0 ].limit())); System.out.println(new String (buffers[1 ].array(), 0 , buffers[1 ].limit())); outChannel.write(buffers); outChannel.close(); inChannel.close(); raf2.close(); raf1.close(); }
附2.Pipe 管道 如果说 FileChannel 是为了读写文件,SocketChannel 是为了网络通信,那么 Pipe 就是专门为了在同一个 JVM 进程下的两个线程之间进行单向数据传输而设计的。NIO 的管道不是一个简单的字节数组,它由两个特殊的“端点”组成:
SinkChannel(汇聚洞口): 负责写入。数据从这里进去。SourceChannel(源头洞口): 负责读取。数据从这里出来。
1 2 3 4 5 6 7 8 9 10 11 12 13 14 15 16 17 18 19 20 21 22 23 24 25 26 27 28 29 30 31 32 33 34 35 36 37 38 39 40 41 42 43 44 45 46 47 48 49 50 51 52 53 54 55 56 57 58 59 60 61 62 63 64 65 66 67 68 69 70 71 72 73 import java.nio.ByteBuffer;import java.nio.channels.Pipe;import java.nio.charset.StandardCharsets;public class PipeDemo { public static void main (String[] args) throws Exception { Pipe pipe = Pipe.open(); Thread t1 = new Thread (() -> { try (Pipe.SinkChannel sinkChannel = pipe.sink()) { for (int i = 0 ; i < 5 ; i++) { String msg = "来自线程 t1 的数据包 [" + i + "]" ; byte [] bytes = msg.getBytes(StandardCharsets.UTF_8); ByteBuffer buffer = ByteBuffer.wrap(bytes); while (buffer.hasRemaining()) { sinkChannel.write(buffer); } System.out.println("[发送端] 已写入: " + msg); Thread.sleep(1000 ); } } catch (Exception e) { e.printStackTrace(); } System.out.println("[发送端] 传输结束,关闭 SinkChannel" ); }, "t1" ); Thread t2 = new Thread (() -> { try (Pipe.SourceChannel sourceChannel = pipe.source()) { ByteBuffer buffer = ByteBuffer.allocate(1024 ); while (sourceChannel.read(buffer) != -1 ) { buffer.flip(); byte [] received = new byte [buffer.remaining()]; buffer.get(received); String msg = new String (received, StandardCharsets.UTF_8); System.out.println("[接收端] 收到数据: " + msg); buffer.clear(); } } catch (Exception e) { e.printStackTrace(); } System.out.println("[接收端] 检测到对端关闭,读取结束" ); }, "t2" ); t1.start(); t2.start(); } }
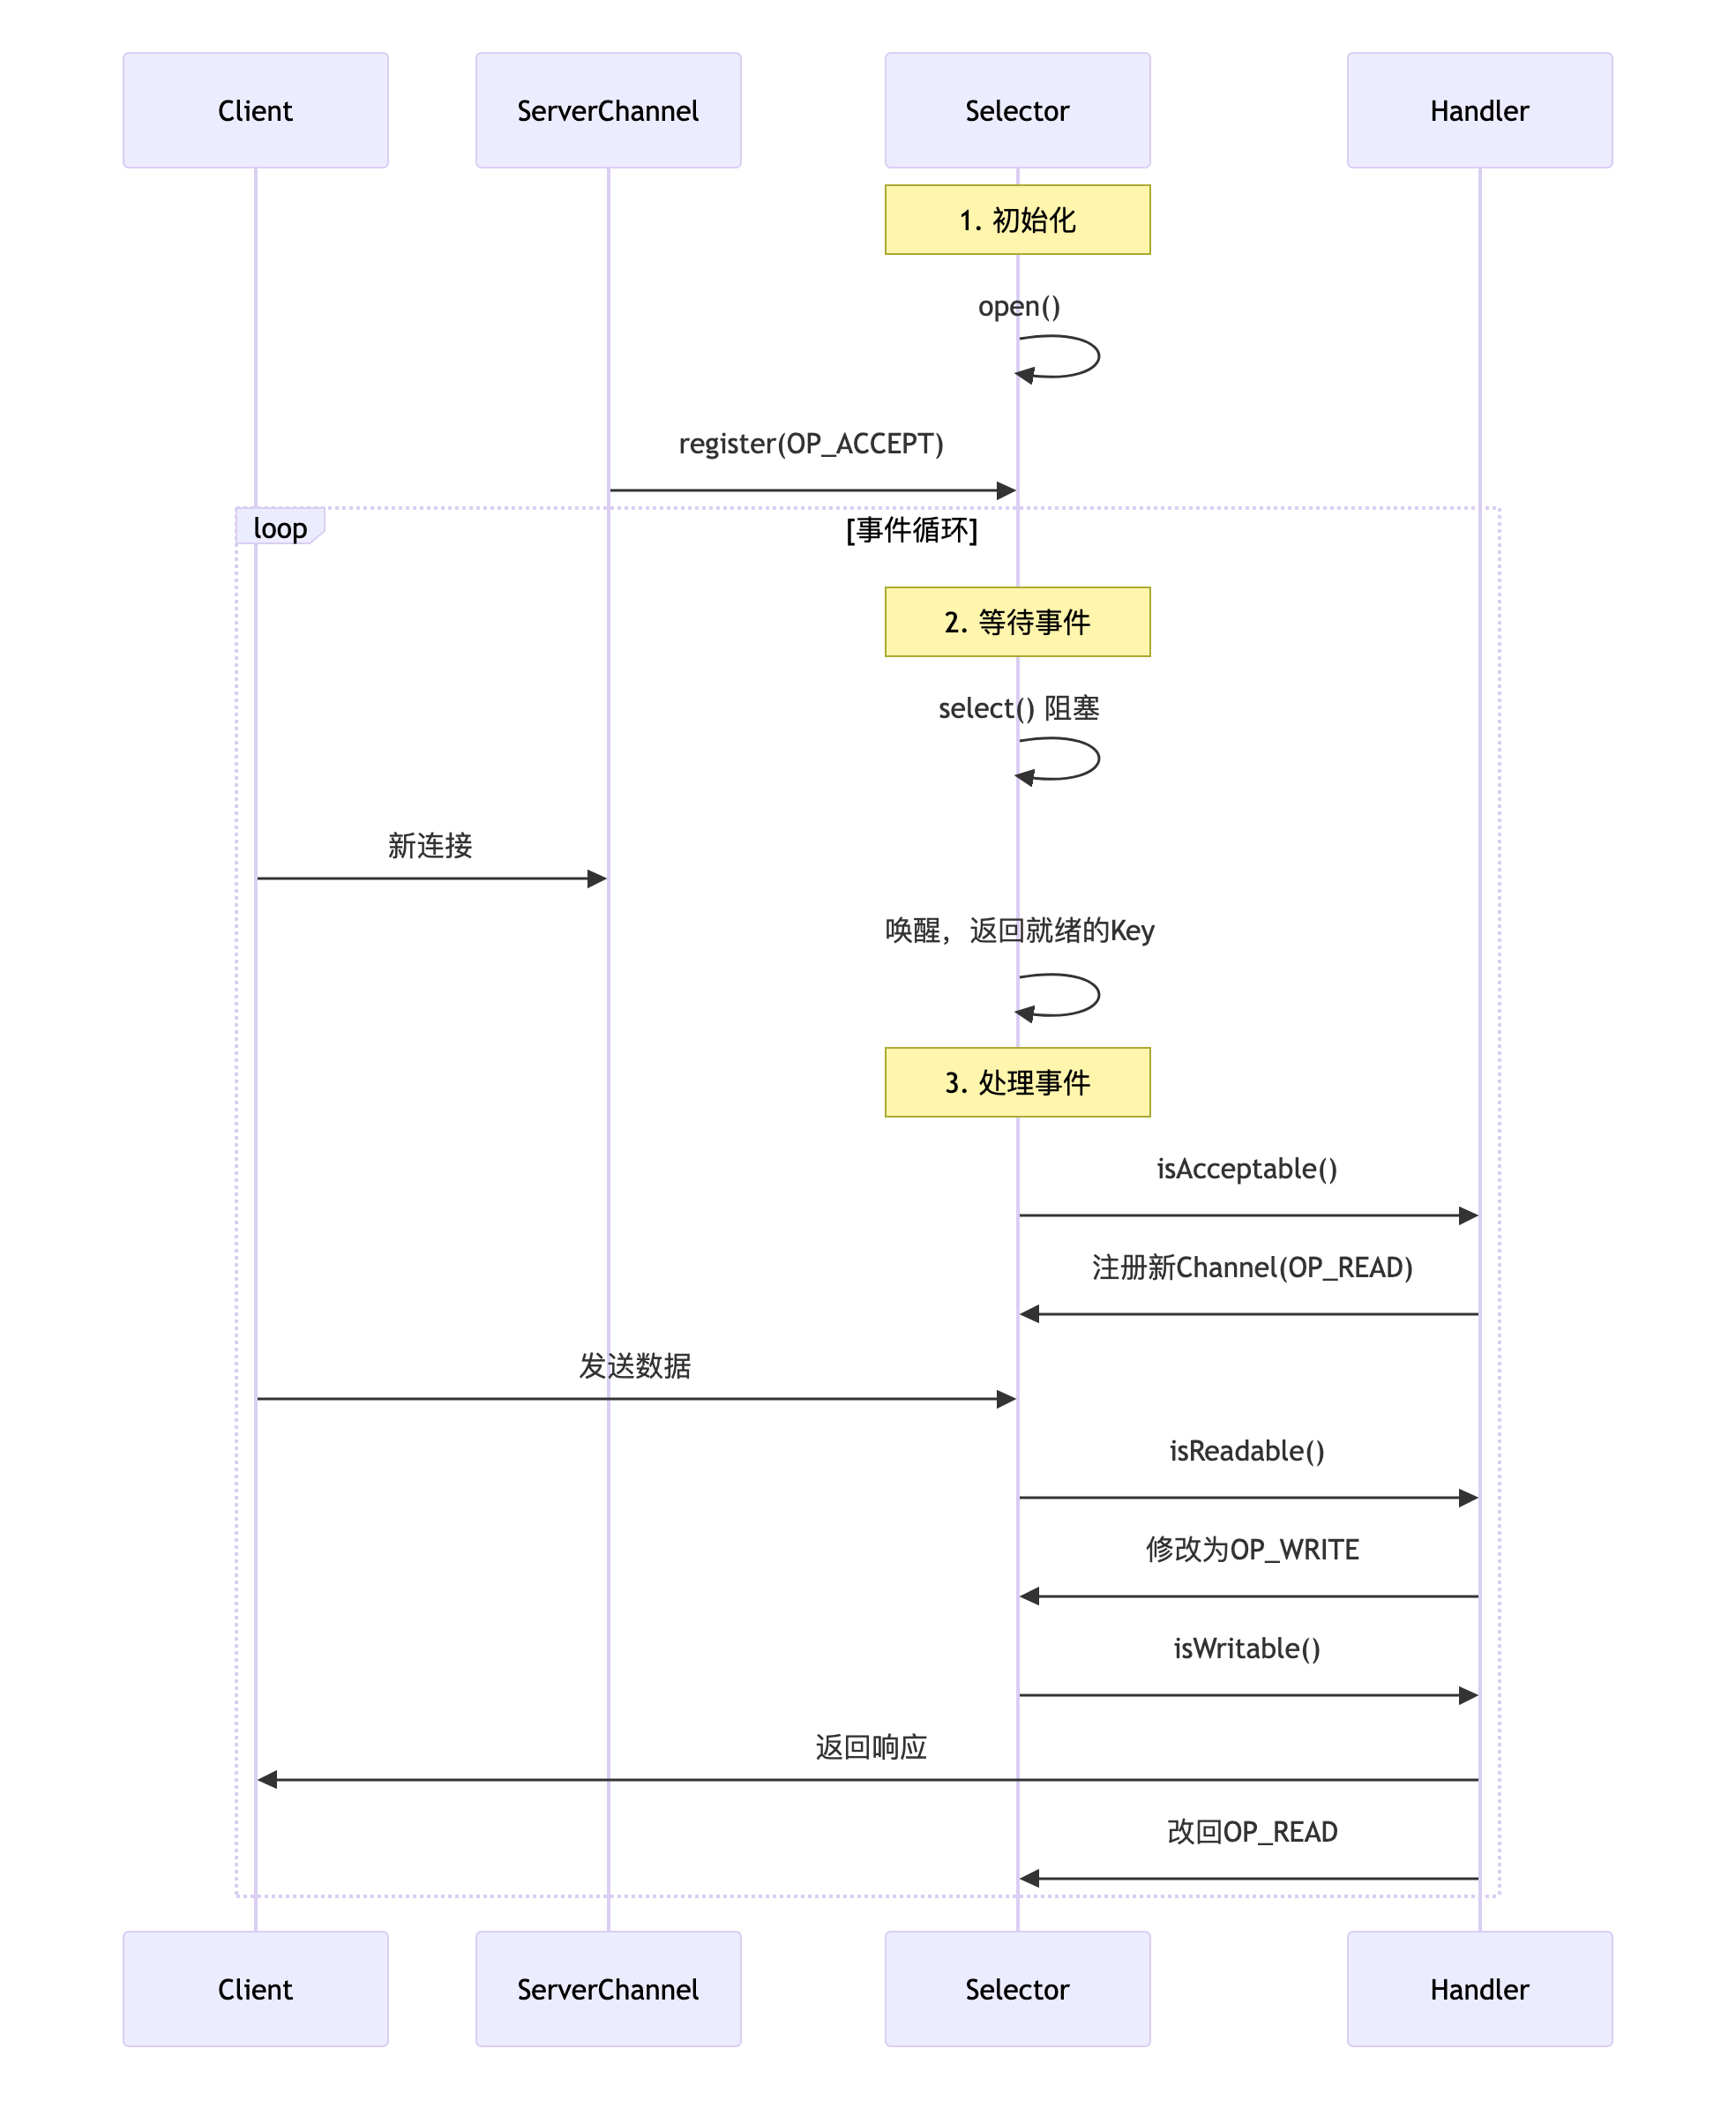
选择器(selector) 什么是选择器 简单地说,选择器的使命是完成IO的多路复用,其主要工作是通 道的注册、监听、事件查询。一个通道代表一条连接通路,通过选择器可以同时监控多个通道的IO(输入输出)状况。选择器和通道的关 系是监控和被监控的关系。选择器提供了独特的API方法,能够选出(select)所监控的通道 已经发生了哪些IO事件,包括读写就绪的IO操作事件。
在NIO编程中,一般是一个单线程处理一个选择器,一个选择器可以监控很多通道。所以通过选择器,一个单线程可以处理数百、数千、数万甚至更多的通道。在极端情况下(数万个连接),只用一个线程就可以处理所有的通道,这样会大量地减少线程之间上下文切换的开销。
通道和选择器之间的关联通过register(注册)的方式完成。调用通道的 Channel.register(Selector sel,int ops) 方法,可以将通道实例注册到一个选择器中。register 方法有两个参数:第一个参数指定通道注册到的选择器实例;第二个参数指定选择器要监控的IO事件类型。可供选择器监控的通道IO事件类型包括以下四种:
可读就绪事件:SelectionKey.OP_READ, 1 << 0
可写就绪事件:SelectionKey.OP_WRITE, 1 << 2
连接就绪事件:SelectionKey.OP_CONNECT, 1 << 3
接收就绪事件:SelectionKey.OP_ACCEPT, 1 << 4
以上事件类型常量定义在SelectionKey类中。如果选择器要监控 通道的多种事件,可以用“按位或”运算符来实现。例如,同时监控 可读和可写IO事件:
1 2 int key = SelectionKey.OP_READ | SelectionKey.OP_WRITE;
这里有必要解释一下什么是IO事件?IO事件不是对通道的IO操作,而是通道处于某个IO操作的就绪状态,表示通道具备执 行某个IO操作的条件。例如,某个SocketChannel传输通道如果完成了 和对端的三次握手过程,就会发生“连接就绪”(OP_CONNECT)事 件;某个ServerSocketChannel服务器连接监听通道,在监听到一个新 连接到来时,则会发生“接收就绪”(OP_ACCEPT)事件;一个 SocketChannel通道有数据可读,就会发生“读就绪”(OP_READ)事 件;一个SocketChannel通道等待数据写入,就会发生“写就绪” (OP_WRITE)事件。
SelectableChannel 类 并不是所有的通道都是可以被选择器监控或选择的。例如, FileChannel就不能被选择器复用。判断一个通道能否被选择器监控或选择有一个前提:判断它是否继承了抽象类 SelectableChannel(可选 择通道)。SelectableChannel 提供了实现通道可选择性 所需要的公共方法。Java NIO中所有网络连接socket通道都继承了 SelectableChannel类,都是可选择的。FileChannel并没有继承 SelectableChannel,因此不是可选择通道。
SelectionKey 类 通道和选择器的监控关系注册成功后就可以选择就绪事件,具体 的选择工作可调用 Selector 的 select() 方法来完成。通过该方法,选择器可以不断地选择通道中所发生操作的就绪状态,返回注册过的那些感兴趣的IO事件。换句话说,一旦在通道中发生了某些IO事件(就绪状态达成),并且是在选择器中注册过的IO事件,就会被选择器选中,并放入 SelectionKey(选择键)的集合中。
SelectionKey 是什么呢?简单地说,SelectionKey 就是那些被选择器选中的IO事件。一个IO事件发生(就绪状态达成) 后,如果之前在选择器中注册过,就会被选择器选中,并放入 SelectionKey中;如果之前没有注册过,那么即使发生了IO事件,也 不会被选择器选中。SelectionKey和IO的关系可以简单地理解为 SelectionKey 就是被选中了的IO事件。通过 SelectionKey,我们不仅可以获得通道的IO事件类型,还可以获得发生IO事件所在的通道,甚至可以获得选择器实例。
选择器的使用步骤 第一步:获取选择器实例。
1 2 3 Selector selector = Selector.open();
第二步:将通道注册到选择器实例。
1 2 3 4 5 6 7 8 9 10 11 ServerSocketChannelserverSocketChannel = ServerSocketChannel.open(); serverSocketChannel.configureBlocking(false ); serverSocketChannel.bind(new InetSocketAddress (18899 )); serverSocketChannel.register(selector,SelectionKey.OP_ACCEPT);
第三步:选出感兴趣的IO就绪事件(选择键集合)。
1 Set selectedKeys = selector.selectedKeys();
第四步:迭代集合的每一个选择键,根据具体IO事件类型执行对 应的业务操作。用于选择就绪的IO事件的select()方法有多个重载的实现版本, 具体如下:
select():阻塞调用,直到至少有一个通道发生了注册的 IO 事件。
select(long timeout):和select()一样,但最长阻塞时间 为timeout 指定的毫秒数。
selectNow():非阻塞,不管有没有 IO 事件都会立刻返回。
select() 方法的返回值是整数类型(int),表示发生了IO事件的数量,即从上一次select到这一次select之间有多少通道发生了IO事 件,更加准确地说是发生了选择器感兴趣(注册过)的IO事件数。
1 2 3 4 5 6 7 8 9 10 11 12 13 14 15 16 17 18 19 20 21 22 23 24 25 26 27 28 29 30 31 32 33 34 35 36 while (selector.select() > 0 ) { Set selectedKeys = selector.selectedKeys(); Iterator keyIterator = selectedKeys.iterator(); while (keyIterator.hasNext()) { SelectionKey key = keyIterator.next(); keyIterator.remove(); if (!key.isValid()) { continue ; } try { if (key.isAcceptable()) { handleAccept(key); } else if (key.isConnectable()) { handleConn(key); } else if (key.isReadable()) { handleRead(key); } else if (key.isWritable()) { handleWrite(key); } } catch (CancelledKeyException e) { } catch (Exception e) { handleException(key, e); if (key.isValid()) { key.cancel(); try { key.channel().close(); } catch (IOException ignored) {} } } } }
Discard服务演示案例 服务端:
1 2 3 4 5 6 7 8 9 10 11 12 13 14 15 16 17 18 19 20 21 22 23 24 25 26 27 28 29 30 31 32 33 34 35 36 37 38 39 40 41 42 43 44 45 46 47 48 49 50 51 52 53 54 55 56 57 58 59 60 61 62 63 64 65 66 67 68 69 70 71 72 73 74 75 76 77 78 79 80 81 82 83 84 85 86 87 88 89 90 91 92 93 94 95 96 97 98 99 100 101 102 103 104 105 106 107 108 109 110 111 112 113 114 115 116 117 118 119 120 121 122 123 124 125 126 127 128 129 130 131 132 133 134 135 136 137 138 139 140 141 142 143 144 145 146 147 148 149 150 151 152 153 154 155 156 157 158 159 160 161 162 163 164 165 166 167 168 169 170 171 172 173 174 175 176 177 178 179 180 181 182 183 184 185 186 187 188 189 190 191 192 193 194 195 196 197 198 import java.io.IOException;import java.net.InetSocketAddress;import java.nio.ByteBuffer;import java.nio.channels.*;import java.nio.charset.StandardCharsets;import java.util.Iterator;public class NioDiscardServer { public static void main (String[] args) throws IOException { startServer(); } private static final ThreadLocal<ByteBuffer> BUFFER_CACHE = ThreadLocal.withInitial(() -> ByteBuffer.allocateDirect(8192 )); public static void startServer () throws IOException { Selector selector = null ; ServerSocketChannel serverChannel = null ; try { selector = Selector.open(); serverChannel = ServerSocketChannel.open(); serverChannel.configureBlocking(false ); serverChannel.bind(new InetSocketAddress (9002 )); serverChannel.register(selector, SelectionKey.OP_ACCEPT); System.out.println("NIO Discard 服务器启动在端口 9002" ); while (!Thread.currentThread().isInterrupted()) { int readyChannels = selector.select(1000 ); if (readyChannels == 0 ) { idleTask(); continue ; } Iterator<SelectionKey> keyIterator = selector.selectedKeys().iterator(); while (keyIterator.hasNext()) { SelectionKey selectedKey = keyIterator.next(); keyIterator.remove(); if (!selectedKey.isValid()) { continue ; } try { if (selectedKey.isAcceptable()) { handleAccept(selectedKey, selector); } else if (selectedKey.isReadable()) { handleRead(selectedKey); } else if (selectedKey.isWritable()) { handleWrite(selectedKey); } } catch (IOException e) { System.err.println("处理事件失败: " + e.getMessage()); cleanupKey(selectedKey); } catch (CancelledKeyException e) { } } } } catch (IOException e) { System.err.println("服务器异常: " + e.getMessage()); throw e; } finally { if (selector != null && selector.isOpen()) { for (SelectionKey key : selector.keys()) { cleanupKey(key); } try { selector.close(); } catch (IOException ignored) {} } if (serverChannel != null && serverChannel.isOpen()) { try { serverChannel.close(); } catch (IOException ignored) {} } } } private static void idleTask () { } private static void cleanupKey (SelectionKey key) { if (key != null ) { key.cancel(); SelectableChannel channel = key.channel(); if (channel != null && channel.isOpen()) { try { channel.close(); System.out.println("关闭连接: " + (channel instanceof SocketChannel ? ((SocketChannel) channel).getRemoteAddress() : "" )); } catch (IOException e) { } } } } private static void handleAccept (SelectionKey key, Selector selector) throws IOException { ServerSocketChannel serverChannel = (ServerSocketChannel) key.channel(); SocketChannel clientChannel = null ; try { clientChannel = serverChannel.accept(); if (clientChannel == null ) { return ; } clientChannel.configureBlocking(false ); clientChannel.register(selector, SelectionKey.OP_READ); System.out.println("接受新连接: " + clientChannel.getRemoteAddress()); } catch (IOException e) { System.err.println("接受连接失败: " + e.getMessage()); if (clientChannel != null ) { clientChannel.close(); } throw e; } } private static void handleRead (SelectionKey key) throws IOException { SocketChannel channel = (SocketChannel) key.channel(); ByteBuffer buffer = BUFFER_CACHE.get(); buffer.clear(); int bytesRead; try { bytesRead = channel.read(buffer); } catch (IOException e) { System.err.println("读取数据失败: " + e.getMessage()); cleanupKey(key); return ; } if (bytesRead == -1 ) { System.out.println("连接关闭: " + channel.getRemoteAddress()); cleanupKey(key); return ; } if (bytesRead == 0 ) { return ; } buffer.flip(); byte [] data = new byte [buffer.remaining()]; buffer.get(data); String message = new String (data, StandardCharsets.UTF_8); System.out.printf("收到来自 %s 的数据[%d字节]: %s%n" , channel.getRemoteAddress(), bytesRead, message.length() > 50 ? message.substring(0 , 50 ) + "..." : message); if (message.trim().equalsIgnoreCase("quit" )) { System.out.println("客户端请求退出: " + channel.getRemoteAddress()); cleanupKey(key); return ; } } private static void handleWrite (SelectionKey key) throws IOException { SocketChannel channel = (SocketChannel) key.channel(); Object attachment = key.attachment(); if (attachment instanceof String response) { ByteBuffer buffer = ByteBuffer.wrap(response.getBytes(StandardCharsets.UTF_8)); while (buffer.hasRemaining()) { channel.write(buffer); } key.interestOps(key.interestOps() & ~SelectionKey.OP_WRITE); key.attach(null ); } } }
客户端
1 2 3 4 5 6 7 8 9 10 11 12 13 14 15 16 17 18 19 20 21 22 23 24 25 26 27 28 29 30 31 32 33 34 35 36 37 38 39 40 41 42 43 44 45 46 47 48 49 50 import java.io.IOException;import java.net.InetSocketAddress;import java.nio.ByteBuffer;import java.nio.channels.SocketChannel;import java.nio.charset.StandardCharsets;import java.util.concurrent.ExecutorService;import java.util.concurrent.Executors;import java.util.concurrent.TimeUnit;public class NioDiscardClient { public static void main (String[] args) throws Exception { testMultipleClients(); } private static void testMultipleClients () throws InterruptedException { ExecutorService executor = Executors.newFixedThreadPool(10 ); for (int i = 0 ; i < 5 ; i++) { int clientId = i; executor.submit(() -> sendMessages(clientId)); } executor.shutdown(); executor.awaitTermination(10 , TimeUnit.SECONDS); } private static void sendMessages (int clientId) { try (SocketChannel channel = SocketChannel.open()) { channel.configureBlocking(true ); channel.connect(new InetSocketAddress ("127.0.0.1" , 9002 )); if (channel.finishConnect()) { System.out.printf("Client-%d 连接成功%n" , clientId); for (int i = 0 ; i < 3 ; i++) { String message = String.format("Hello from Client-%d, Message-%d" , clientId, i); ByteBuffer buffer = ByteBuffer.wrap(message.getBytes(StandardCharsets.UTF_8)); while (buffer.hasRemaining()) { channel.write(buffer); } System.out.printf("Client-%d 发送: %s%n" , clientId, message); Thread.sleep(1000 ); } ByteBuffer quitBuffer = ByteBuffer.wrap("quit" .getBytes()); channel.write(quitBuffer); System.out.printf("Client-%d 发送退出命令%n" , clientId); } } catch (IOException | InterruptedException e) { System.err.printf("Client-%d 错误: %s%n" , clientId, e.getMessage()); } } }
服务端日志:
1 2 3 4 5 6 7 8 9 10 11 12 13 14 15 16 17 18 19 20 21 22 23 24 25 26 27 28 29 30 31 NIO Discard 服务器启动在端口 9002 接受新连接: /127.0.0.1:56128 接受新连接: /127.0.0.1:56130 接受新连接: /127.0.0.1:56129 接受新连接: /127.0.0.1:56131 接受新连接: /127.0.0.1:56132 收到来自 /127.0.0.1:56132 的数据[30字节]: Hello from Client-3, Message-0 收到来自 /127.0.0.1:56128 的数据[30字节]: Hello from Client-1, Message-0 收到来自 /127.0.0.1:56130 的数据[30字节]: Hello from Client-4, Message-0 收到来自 /127.0.0.1:56131 的数据[30字节]: Hello from Client-0, Message-0 收到来自 /127.0.0.1:56129 的数据[30字节]: Hello from Client-2, Message-0 收到来自 /127.0.0.1:56131 的数据[30字节]: Hello from Client-0, Message-1 收到来自 /127.0.0.1:56132 的数据[30字节]: Hello from Client-3, Message-1 收到来自 /127.0.0.1:56128 的数据[30字节]: Hello from Client-1, Message-1 收到来自 /127.0.0.1:56130 的数据[30字节]: Hello from Client-4, Message-1 收到来自 /127.0.0.1:56129 的数据[30字节]: Hello from Client-2, Message-1 收到来自 /127.0.0.1:56131 的数据[30字节]: Hello from Client-0, Message-2 收到来自 /127.0.0.1:56132 的数据[30字节]: Hello from Client-3, Message-2 收到来自 /127.0.0.1:56128 的数据[30字节]: Hello from Client-1, Message-2 收到来自 /127.0.0.1:56130 的数据[30字节]: Hello from Client-4, Message-2 收到来自 /127.0.0.1:56129 的数据[30字节]: Hello from Client-2, Message-2 收到来自 /127.0.0.1:56132 的数据[4字节]: quit 客户端请求退出: /127.0.0.1:56132 收到来自 /127.0.0.1:56131 的数据[4字节]: quit 客户端请求退出: /127.0.0.1:56131 收到来自 /127.0.0.1:56128 的数据[4字节]: quit 客户端请求退出: /127.0.0.1:56128 收到来自 /127.0.0.1:56130 的数据[4字节]: quit 客户端请求退出: /127.0.0.1:56130 收到来自 /127.0.0.1:56129 的数据[4字节]: quit 客户端请求退出: /127.0.0.1:56129
字符集与编解码 NIO支持的字符集 1 2 3 4 5 6 @Test public void test04 () { SortedMap<String,Charset> charsets = Charset.availableCharsets(); charsets.forEach((k,v) -> System.out.println("k=" + k + ", v=" + v)); }
常见的有GBK、UTF-8、UTF-16、ASCII、ISO-8859-1等。
字符编码的使用案例 1 2 3 4 5 6 7 8 9 10 11 12 13 14 15 16 17 18 @Test public void test05 () throws IOException { Charset charset = Charset.forName("GBK" ); CharBuffer charBuffer = CharBuffer.allocate(1024 ); charBuffer.put("你好,keyllo" ); CharsetEncoder encoder = charset.newEncoder(); charBuffer.flip(); ByteBuffer byteBuffer = encoder.encode(charBuffer); for (int i = 0 ; i < byteBuffer.limit(); i++) { System.out.println(byteBuffer.get()); } CharsetDecoder decoder = charset.newDecoder(); byteBuffer.flip(); CharBuffer charBuffer2 = decoder.decode(byteBuffer); System.out.println(charBuffer2.toString()); }
标题:
Java NIO - 基础之 Selector、Channel、Buffer